AILERON MODIFICATIONS ON AN HP-18
by
BRUCE PATTON
The aileron system on the HP-18, as designed needs help. I have incorporated four changes in my ship and like the results. There are five problems with the original design:
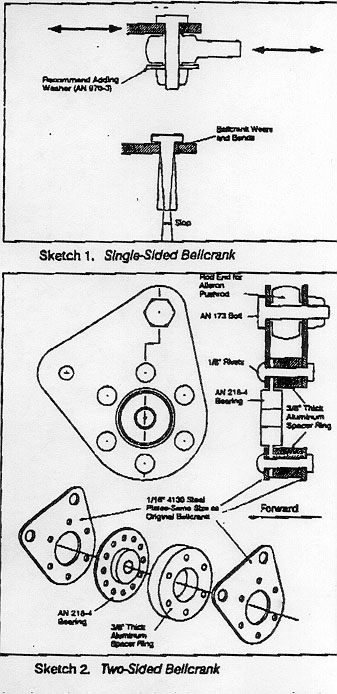
1. Single sided bellcranks
2. Aileron Gap covers
3. Aileron push-rod
4. Ailerons size
5. No aileron differential
I personally would be very reluctant to fly any -18 that did not have problems 1 and 3 fixed. The system has 16 joints, and the movements are relatively small. Slop or lost motion in any joint results in potential flutter. Check your system by blocking the aileron. Apply about 25 lbs on the stick. Movement should be less than 1/4 inch. With the joints fixed, tight, and in good shape, this is about the best you can get.
The fifth problem is the most difficult, and I don't have a solution. Differential might make problem 4 go away. The best way to get differential in the system is changing the wing bellcrank. Any persons with an un-skinned wing should modify their system by revising the aileron bellcrank. You can mess with the mixer and carry-thru bellcranks layouts, but the basic design needs change. (The plans have you set-up the system with 20 up, 15 Degrees down, but the mechanics are 1:1.)
I wrote a computer program to simulate the system. It took hours of playing to get a combination that is constructible. The answer is not easy, and requires changes in the shape, location and rotation of the mixer mounted bellcrank. My fix works for a new fuselage I have under construction with a center stick, one piece forward lifting canopy, etc. I never got a solution workable for the side stick.
The sketches do not include dimensions or a lot of detail. Locations and sizes depend on the existing airplane. Generally do not change things like locations of holes unless you are sure there is no impact. I did not include details such as part numbers of rod ends, or bolt sizes. These depend on what you have available, or can scrounge.
BELLCRANKS
A single sided bellcrank, as used on the spar carry-thru, induces a torsion into a joint designed to simply push or pull. As a result, unless the bolts are very tight, and drilled and reamed with 0 tolerance, a lot of wiggle results. Since the joint is taken apart at disassembly, it will not remain tight. It is a misapplication of a highly loaded rod end.
If you don't do this modification, please, put a large washer under the bolt head to restrain the rod end in case of failure. They do come apart, and with a restraining washer you may have some control and the system will not jam up. See Sketch 1.
Sketch 2 is an improved design for the spar carry-thru bellcranks. It allows easy disassembly using a castle nut and safety pin. I used AN173 "0" tolerance bolts and have absolutely no lost motion in the joints.
Replace the flat pushrods that run between the mixer bellcrank and spar carry-thru cranks with a tube, two AN490 threaded ends, a pair of rod ends and lock nuts as required.
It is not necessary to revise the mixer bellcrank if the bolt holes are reamed accurately, maintained tight, and a restraining washer included. ADD The bolts on the rod ends on the new pushrods can be made tight, instead of being pivots. This prevents wear and slop.
Modifying this bellcrank to double-sided can be done. I have done it on my nearly complete center stick fuselage, but is very difficult with the side stick. The problem is avoiding large torsional forces on the mixer tube. My new design balances the torque placed on the mixer tube, but cannot be used with a side stick. With the original design, the mixer tube twists with large aileron forces, resulting in some lost motion. If the connection to the flap mixer plate is tight, the application can be acceptable.
AILERON GAP COVERS

Sketch 3 shows a good aileron gap cover. The original cover was a miserable failure and a lot of friction (until they delaminated and became a bump). My ailerons and flaps were between 1/32 and 3/16 shorter than the rear spar. As a result, I glued a piece of balsa wood on the top of each section and sanded them down in a to a good fit with the wing. This allowed me to inlet the wiper. The wiper is 6061 T0, .035 dead soft aluminum. This is easy to form to the required curve. Use a tube, about 2" in diameter to bend the curve. Fine trim the curve by hand on the wing. The wiper is glued with EA 9410 and 1/16 countersunk rivets at 3" for security. The seal is a 1 1/2" mylar strip held on with 1/2" Scotch Transfer Tape. Keep it light, and do flutter testing afterwards. Don't do flutter testing without mods 1 and 3, please!
AILERON PUSH ROD, AND SMALL AILERONS
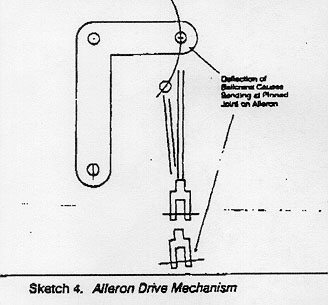
The aileron push rod at the aileron cannot work as designed. What happens is the pin wears the bellcrank until clearances are large enough for it to work. Before then, I guess the piece on the aileron bends. I hate to think about it. After it wears, the joint is ok, but the aileron has a lot of slop. See Sketch 4.
Fixing the above problem gives a way to drive a part of the #4 flap as an aileron. The Ailerons are too small. (Without differential) A HP-18 has more than enough flap. I saw one ship that converted the #4 flap into aileron. He had too much aileron and actually lost effectiveness. (I think part of the problem may have been too much slop.) He remarked that there seemed to be no change in his flap effectiveness, before changing back to the original design.
I converted approximately 14" of the #4 flap and is about right. This length was chosen because of the location of a flap hinge. I would use a little more if I did it again, but no more than 24".
See sketch 5 for details on the aileron root rib bellcrank/driver. You can remove the end magnesium rib to do the change, or leave it in place. I left it in place because it was inset enough to leave room for the necessary parts. To remove the rib, use an industrial heat gun on the aileron skin. At about 180 degrees, just where paint burns, the EA 9410 will soften and the magnesium rib can be pulled out. (You can unglue any joint done with this glue using the same technique. I am not sure if the stuff gets hard again, so don't get things too hot. I removed about 10 sq. feet of wing skin using this method to repair damage caused when a hit-and-run (drunk, naked, and PCP laced) damaged my ship at 2:00 A.M. during a contest. That is another story.)
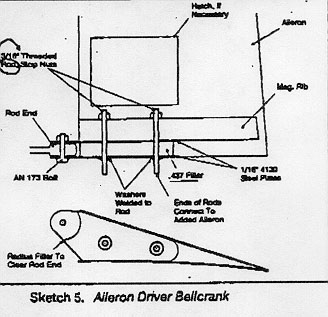
If you don't remove the end rib, it requires cutting an access hatch thru the aileron skin to tighten the nuts, and is as much trouble as removing the rib. Also note you can just use bolts to fasten the new parts to the rib if you do not plan to modify the flap into aileron. Since the rod end is about 3/8 inboard of the original driver, the slot in the wing rear spar needs to be enlarged. Also, to install the bolt in the rod-end, if an aileron extension is added, requires a socket extension the length of the aileron extension. Put the flaps completely down to reach the bolt head by going above the aileron pushrod. It seems impossible at first sight, but can be done! The result is a happy joint, with no slop and the wiggle it needs.
My HP-18 has provided me with hundreds of hours of flying, Silver, Gold, and Diamonds. It is a great ship to fly in Sports Class contests, and in weak conditions stays close to the new ships. With the Carl Harold handicap, it is better, lacking only the right pilot to be a winner. Dick has done an incredible service to American Soaring with his designs. My comments on the design are intended to be constructive, not critical. I am concerned, however, with the aileron system design, and changes 1 & 3 bring it up to good aircraft standards. The original will work ok to start, but after a lot of hours it wears badly and the possibility of flutter becomes a concern.
As Bob said in his Editorial Policy, don't do these modifications without talking to a qualified engineer, and an A & P. They are working in my ship, but I am only responsible for my own work. Very simple errors have very serious consequences when you are too low to bail out, and too high to flap.
Call me with any questions. I am always willing to talk HP with a fellow enthusiast.
(805) 544-1052B